How to send multiple emails with different attachments in Gmail

Have you ever wondered how to send multiple emails with different attachments in Gmail?
Well, you can now easily send a mass email or mail merge in Gmail with personalized attachment files.
Why would you ever need to do this? Let’s say you run a small business that needs to send PDF invoices to your customers once a month. Your billing software generates the PDF invoices, one for each of your 100 customers. Now you need to send the right invoice to the right customer. Until now, you’d have to prepare multiple emails manually — composing and sending 100 individual emails, and having to attach the right PDF to each email.
But now, you can automate all of this. Here’s a two-minute video demo:
What tools will you need to mail merge with individual attachments?
- All of your attachment files, ready to send
- A Google Sheet that lists the email addresses in one column and the file names in the other
- A place to host the files, such as Google Drive, Amazon S3, Dropbox, or your own web server
- A Gmail or Google Workspace account
- GMass installed and connected
Host your attachments somewhere
Your files can either be in your Google Drive or somewhere publicly accessible on the web, like your own web server, a public Dropbox folder, or a public AWS S3 bucket.
If you’re going to host your file attachments in your Google Drive, our software needs permission to access your Google Drive. It’s the one step you have to take in advance of sending any personalized attachments with your bulk emails.
You must give GMass read-only permissions to your Google Drive! By default, GMass doesn’t have permissions for this when you sign up for an account.
——————-
To allow GMass to download different attachment files from your Google Drive:
>>>>>>> FOLLOW THIS LINK <<<<<<<<
——————-
and log in with the same account that you’re using to send your mass email.
Also, note that the files don’t all have to be in the same folder; they can be spread across multiple folders as long as they’re in one single Google Drive account. Lastly, if you use Google Drive, be sure that the “Convert uploaded files…” setting is UNCHECKED:
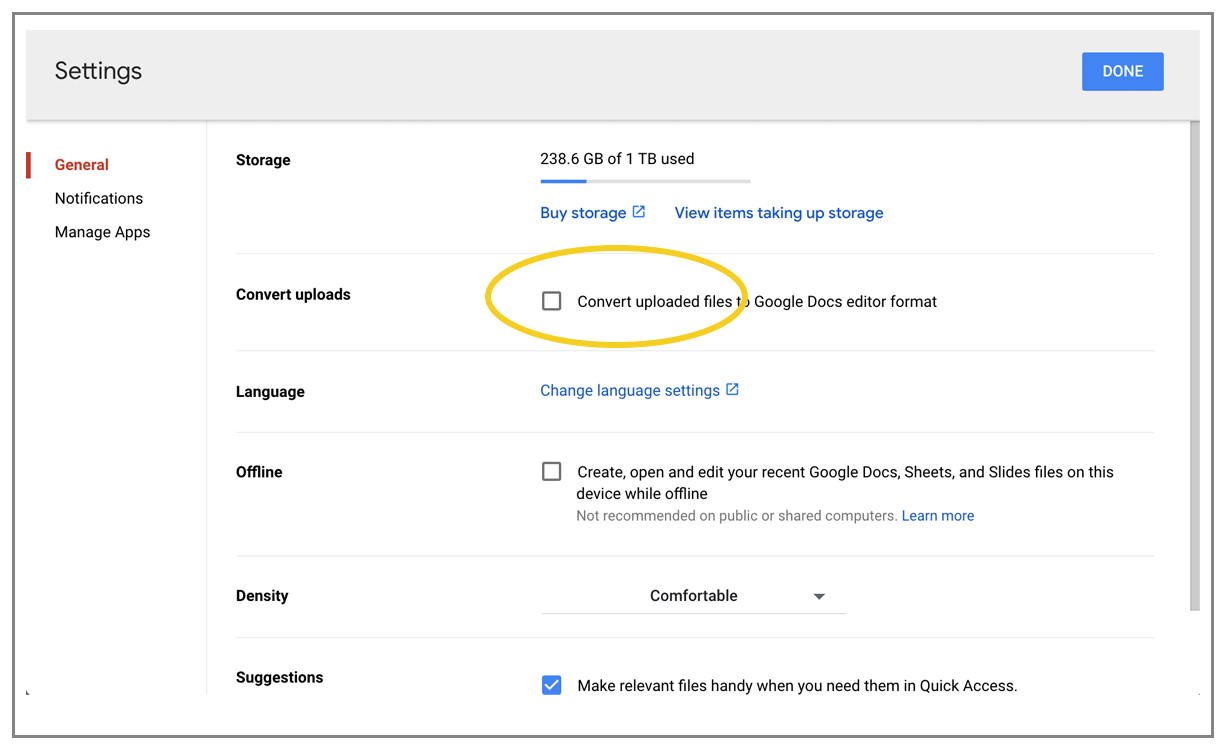
(Click the Settings gear first at the top-right, then uncheck that box, then click DONE.)
If you don’t uncheck this box, then certain file types, like .txt files, won’t remain as txt files after you upload them; they’ll get converted to Google Docs and won’t be “attachable” to your personalized emails.
Set up your Google Sheet
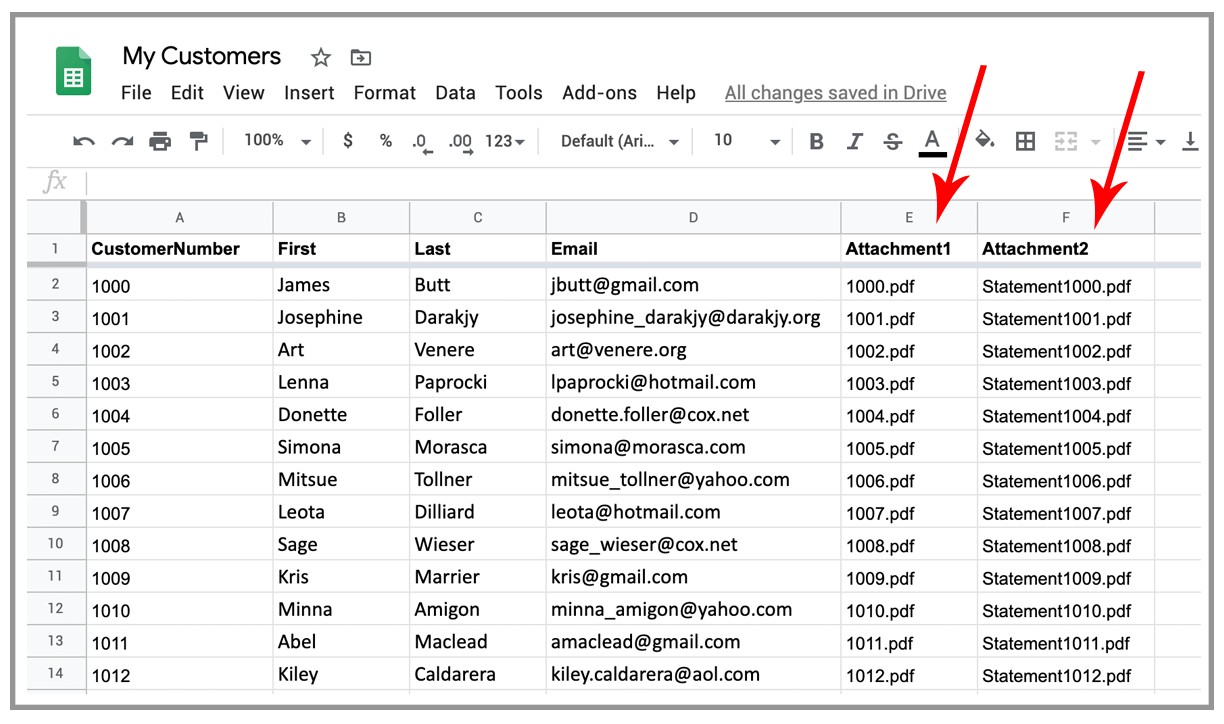
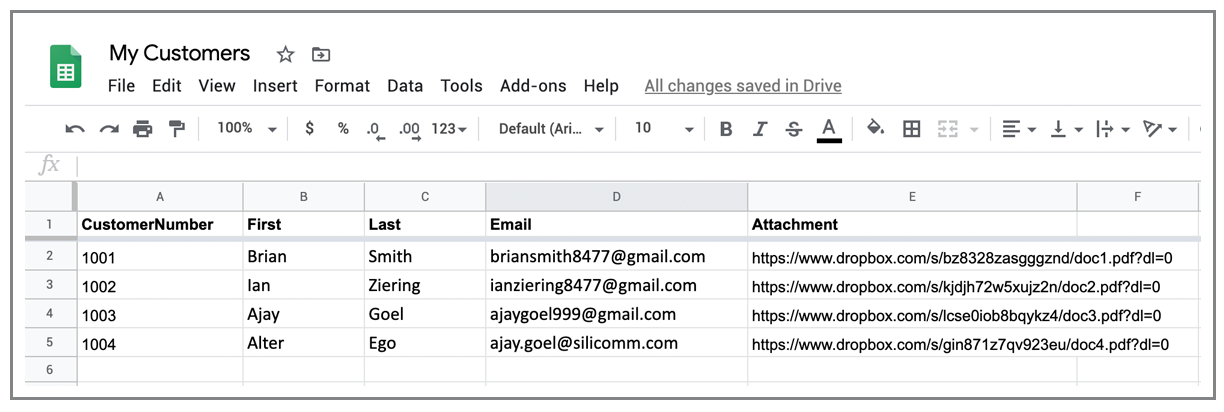
First, set up your Google Sheet. Make sure your column headings are in the first row, and at a minimum you’ll need two columns, one for the email address, and one for the file to be attached. You can have other columns too, like FirstName, LastName, Company, and anything else you want to use to personalize your mail merge. Here’s what your spreadsheet should look like:
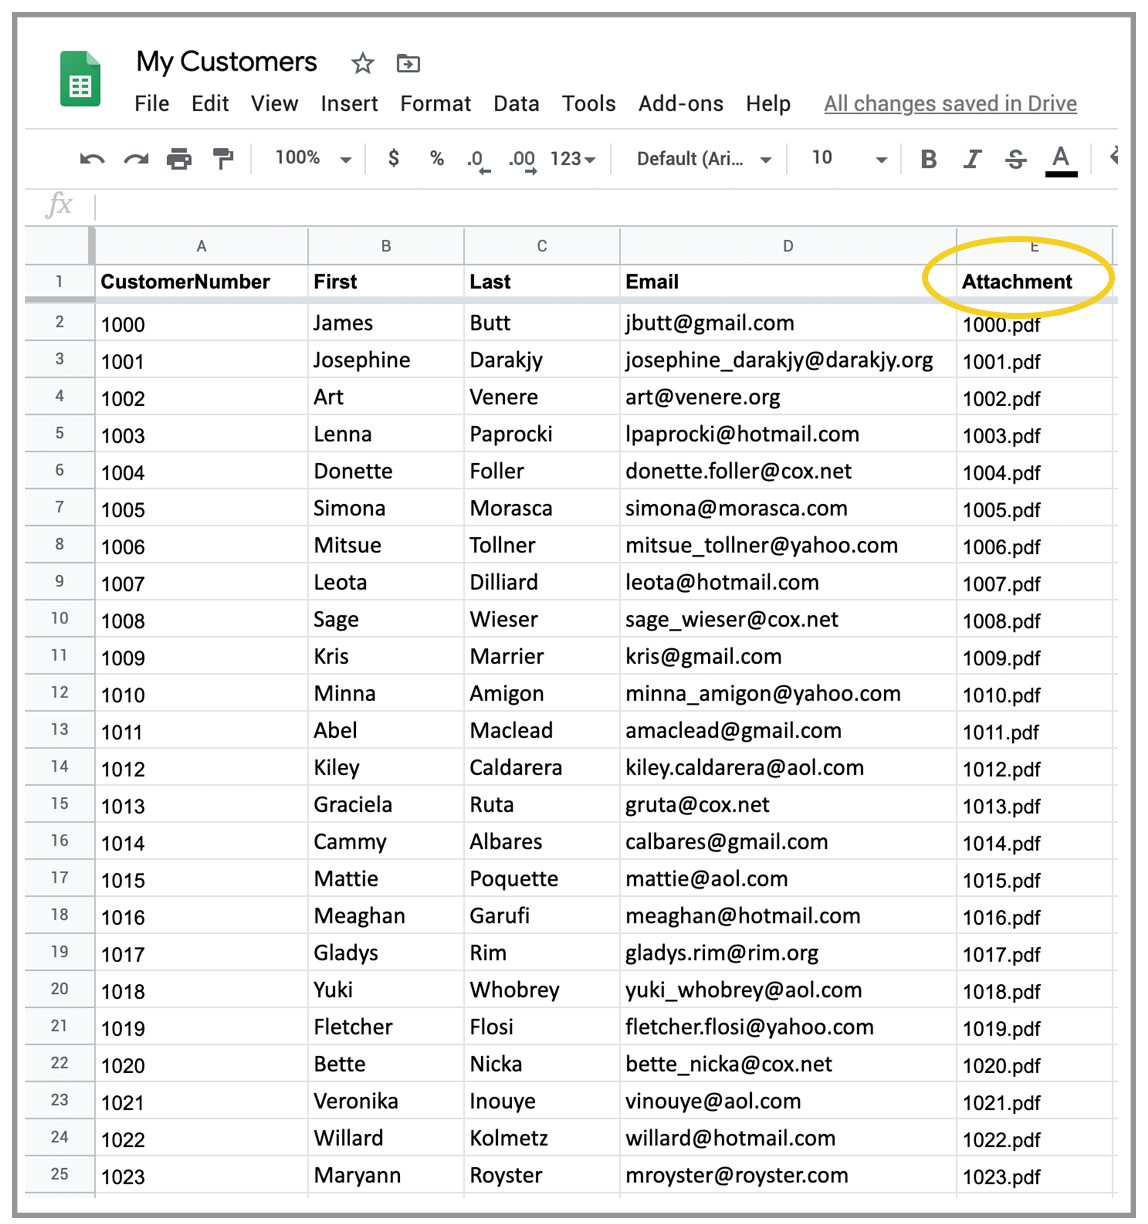
The column containing the files can be named anything as long as it starts with “attachment.” Any of the following are valid column names:
- Attachment
- Attachment1
- AttachmentFile
- attachment10
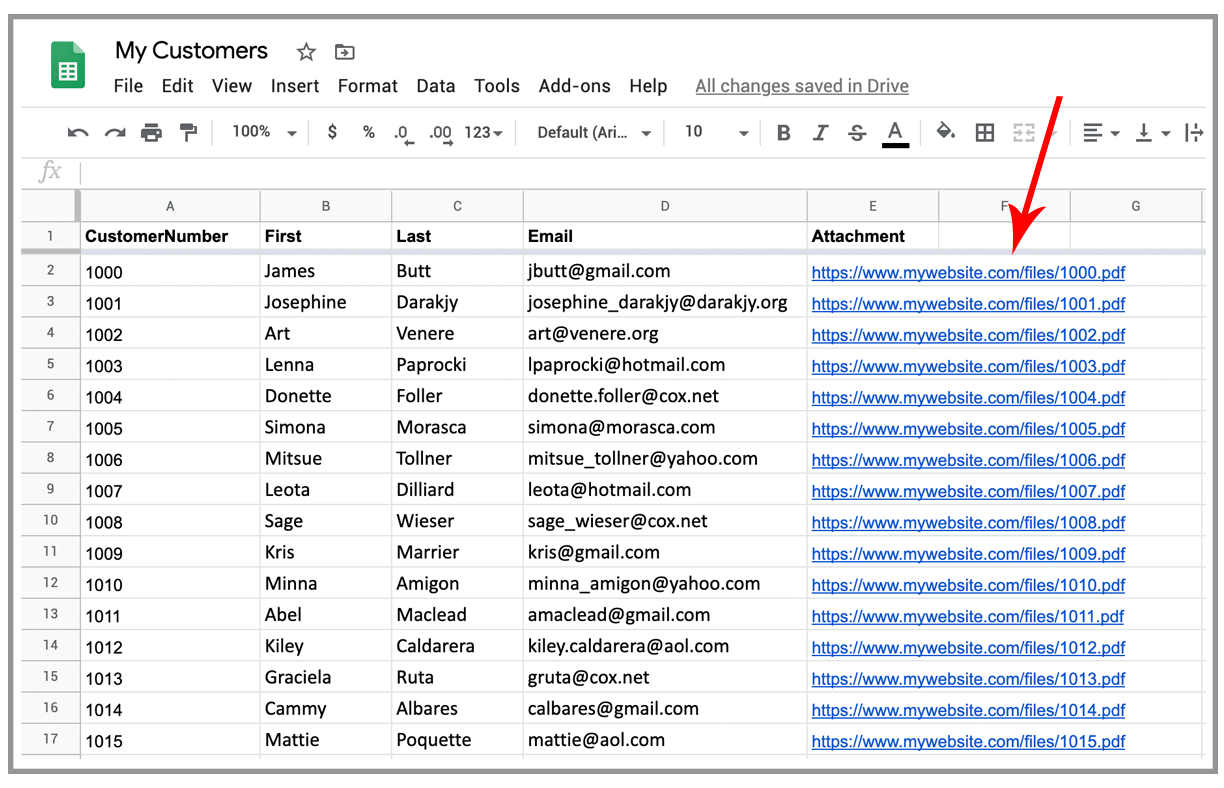
It’s not case sensitive, either. If your files are hosted in Google Drive, then the column should contain just the file attachment name. If your files are hosted somewhere on the web, then the column should contain the full URL to the file. Here’s what your spreadsheet might look like if you’re hosting your files on your own web server for a mailing to multiple recipients.
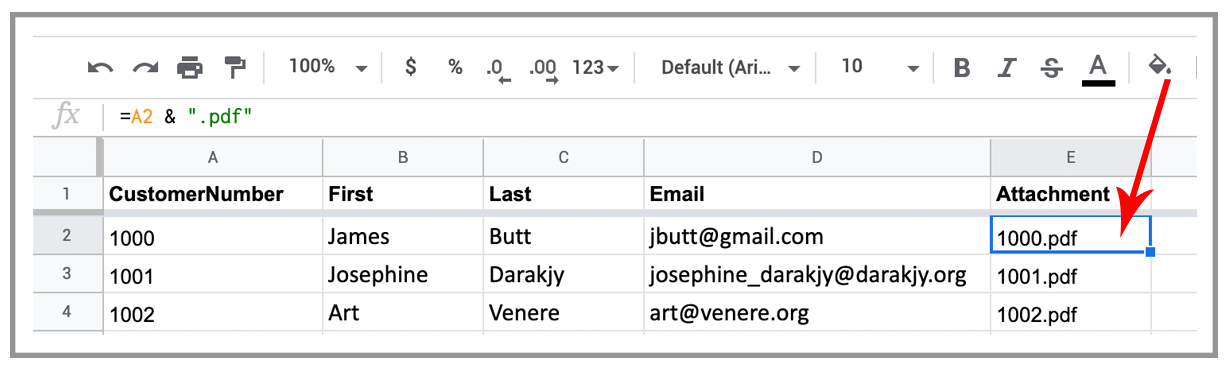
If you’re a spreadsheet wizard, feel free to use formulas for the attachment column as well. For example, if you’re sending monthly statements to your customers, and your billing software generates the monthly statements in the format of [CustomerNumber].pdf, and CustomerNumber is one of the column in your spreadsheet, you can set the attachment column to “=A1” + .pdf.
Finally, if you have blank cells in an “attachment” column, then it’s assumed that those recipients don’t have corresponding files, and the emails will be sent without any file attachment.
Connect to your spreadsheet, compose, and send your messages
If you’ve performed a mail merge with GMass before, the next step should be familiar. Click the Sheets connector button, choose your spreadsheet and worksheet, hit the “Connect” button, and a Gmail Compose will open. Type your message, and hit the GMass button. You don’t need to attach any files to this message. GMass will automatically detect the column in your spreadsheet containing the files to be attached and attach them to the individual emails.
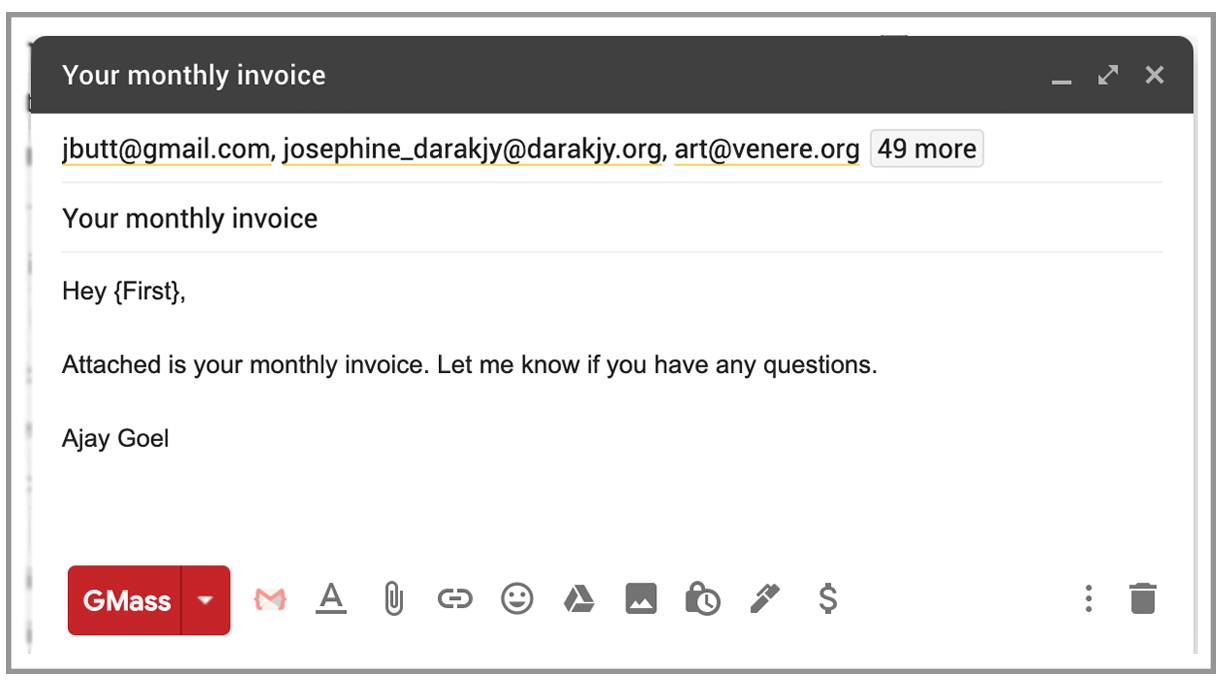
The only reason you would attach a file directly to the Gmail Compose window is if you also want a separate attachment to go to all recipients. In that case, any files you attach to the Draft will be sent to all recipients, and additionally, any personalized attachments set in the spreadsheet will also be sent to separate emails.
For example, let’s say you publish a PDF newsletter monthly that you also want to send to everyone along with their personalized invoices. Then, you would attach the PDF newsletter to the Gmail Compose window, and after clicking GMass, each of the bulk personalized emails would be sent the same newsletter PDF as one attachment and an individual personalized invoice PDF as a second attachment.
Need to send personalized emails with more than one attachment?
Do you need to send more than one personalized attachment per recipient? For example, if every month, you send your customers an invoice and an account summary, and they are two different PDFs, then you can have TWO columns in your spreadsheet, for example:
- Attachment1
- Attachment2
GMass will notice this, and send both personalized files to each recipient.
Automate this to send emails with attachments every day, week, or month
Do you typically send your customers multiple messages each month?
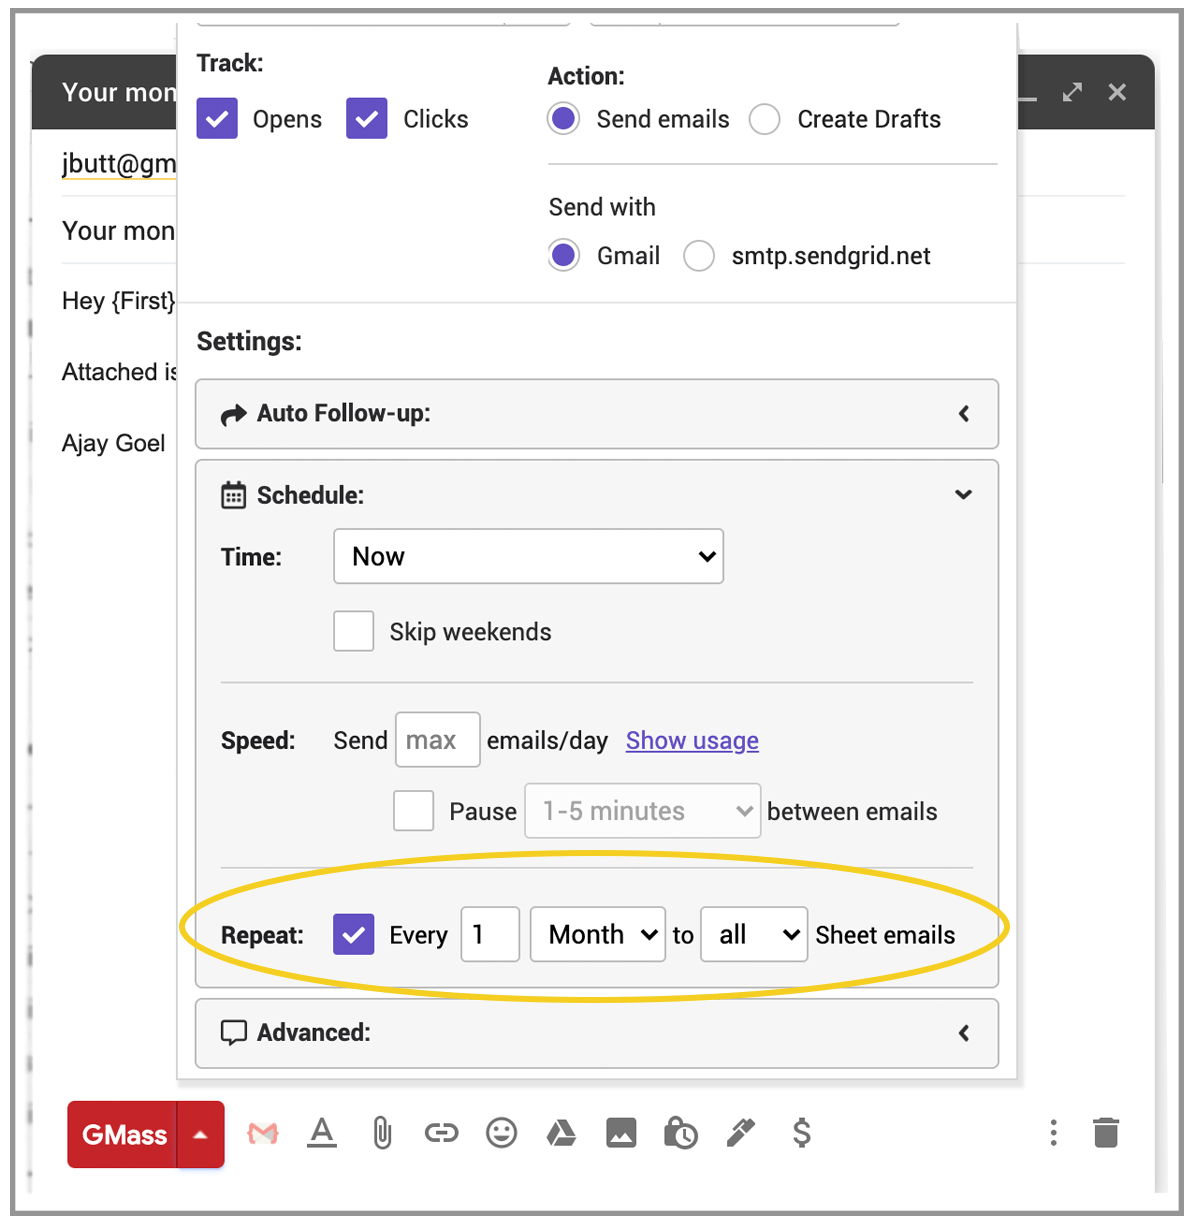
You can set your campaign and spreadsheet up once, and then let the emails send on autopilot every day, week, or month, based on your business’ needs. Let’s say you want your email with attachments to send on the first of every month. Just schedule your initial email to send on the first of the month, and then set it to repeat MONTHLY.
Now, on the first of every month, GMass will automatically read your spreadsheet, retrieve the files, and send the emails with their corresponding attachment. All you need to do before the first of each month is get new files in place, either to your Google Drive, or wherever you’re hosting them.
Error handling for missing files or permissions in GMass or Google
If GMass can’t retrieve the file for a particular email address, that recipient will be skipped over and you’ll get a report at the end of the campaign of all recipients who were skipped. If you intentionally don’t want certain recipients to receive any attachments with their emails, just make those cells blank under the “attachment” column — that way, they will still receive the email but without anything attached. It makes sending multiple emails with different needs quite easy.
If you’re hosting your files on Google Drive, but GMass doesn’t have permission to read from your Google Drive, then your campaign will error out with this error:
Insufficient Permission: Request had insufficient authentication scopes. [403]
Errors [
Message[Insufficient Permission: Request had insufficient authentication scopes.] Location[ – ] Reason[insufficientPermissions
]
GMass didn’t have sufficient permissions to your Gmail account to do what you wanted. If you were trying to send personalized attachments, re-connect your Gmail account and then click the RESTART link.
Using Dropbox to store files for your mail campaign
If you want to use Dropbox to store the files you want attached to your emails, then you’ll have to do some manual work — you’ll have to create public URLs for each and every single file you want to attach, even if all the files are in the same Dropbox folder. While Dropbox makes it easy to get a public link to a folder, and even a public link to a file, Dropbox does not make it easy to generate public links for say, 100 files, without going through the link creation process manually for each of the hundred links you’ll need for a campaign with multiple emails.
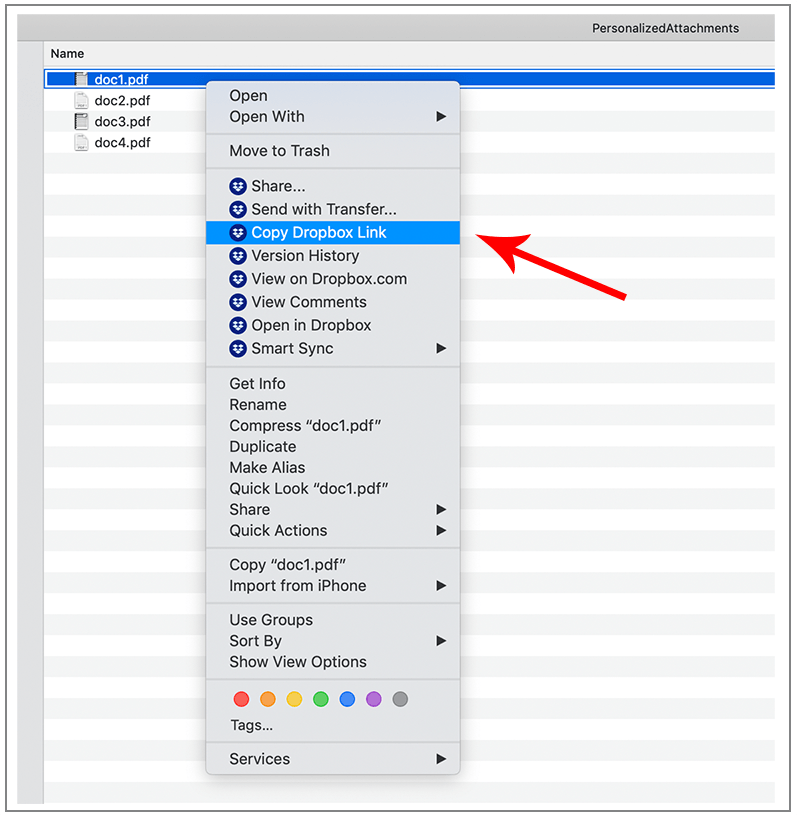
To generate a public link to a file, just right-click the file and choose “Copy Dropbox Link,” and then place that URL in the appropriate Google Sheet column.
But again, you will have to repeat that process for every single file, because there’s no pattern that you can follow to determine the links yourself. For example, if you have two files in Dropbox, doc1.pdf and doc2.pdf, and you generate public URLs to them, they will look like this:
https://www.dropbox.com/s/bz2536zash23znd/doc1.pdf?dl=0
https://www.dropbox.com/s/kjdjf91w5xuip6n/doc2.pdf?dl=0
Now let’s say you have 100 files for which you need to generate public links. While you can see the left portion of the URL includes “dropbox.com,” as expected, and the right portion includes the file name, as expected, there’s a unique identifier string inserted in the middle that prevents you from generating these URLs on your own for easy copying and pasting into a Google Sheet that controls multiple emails.
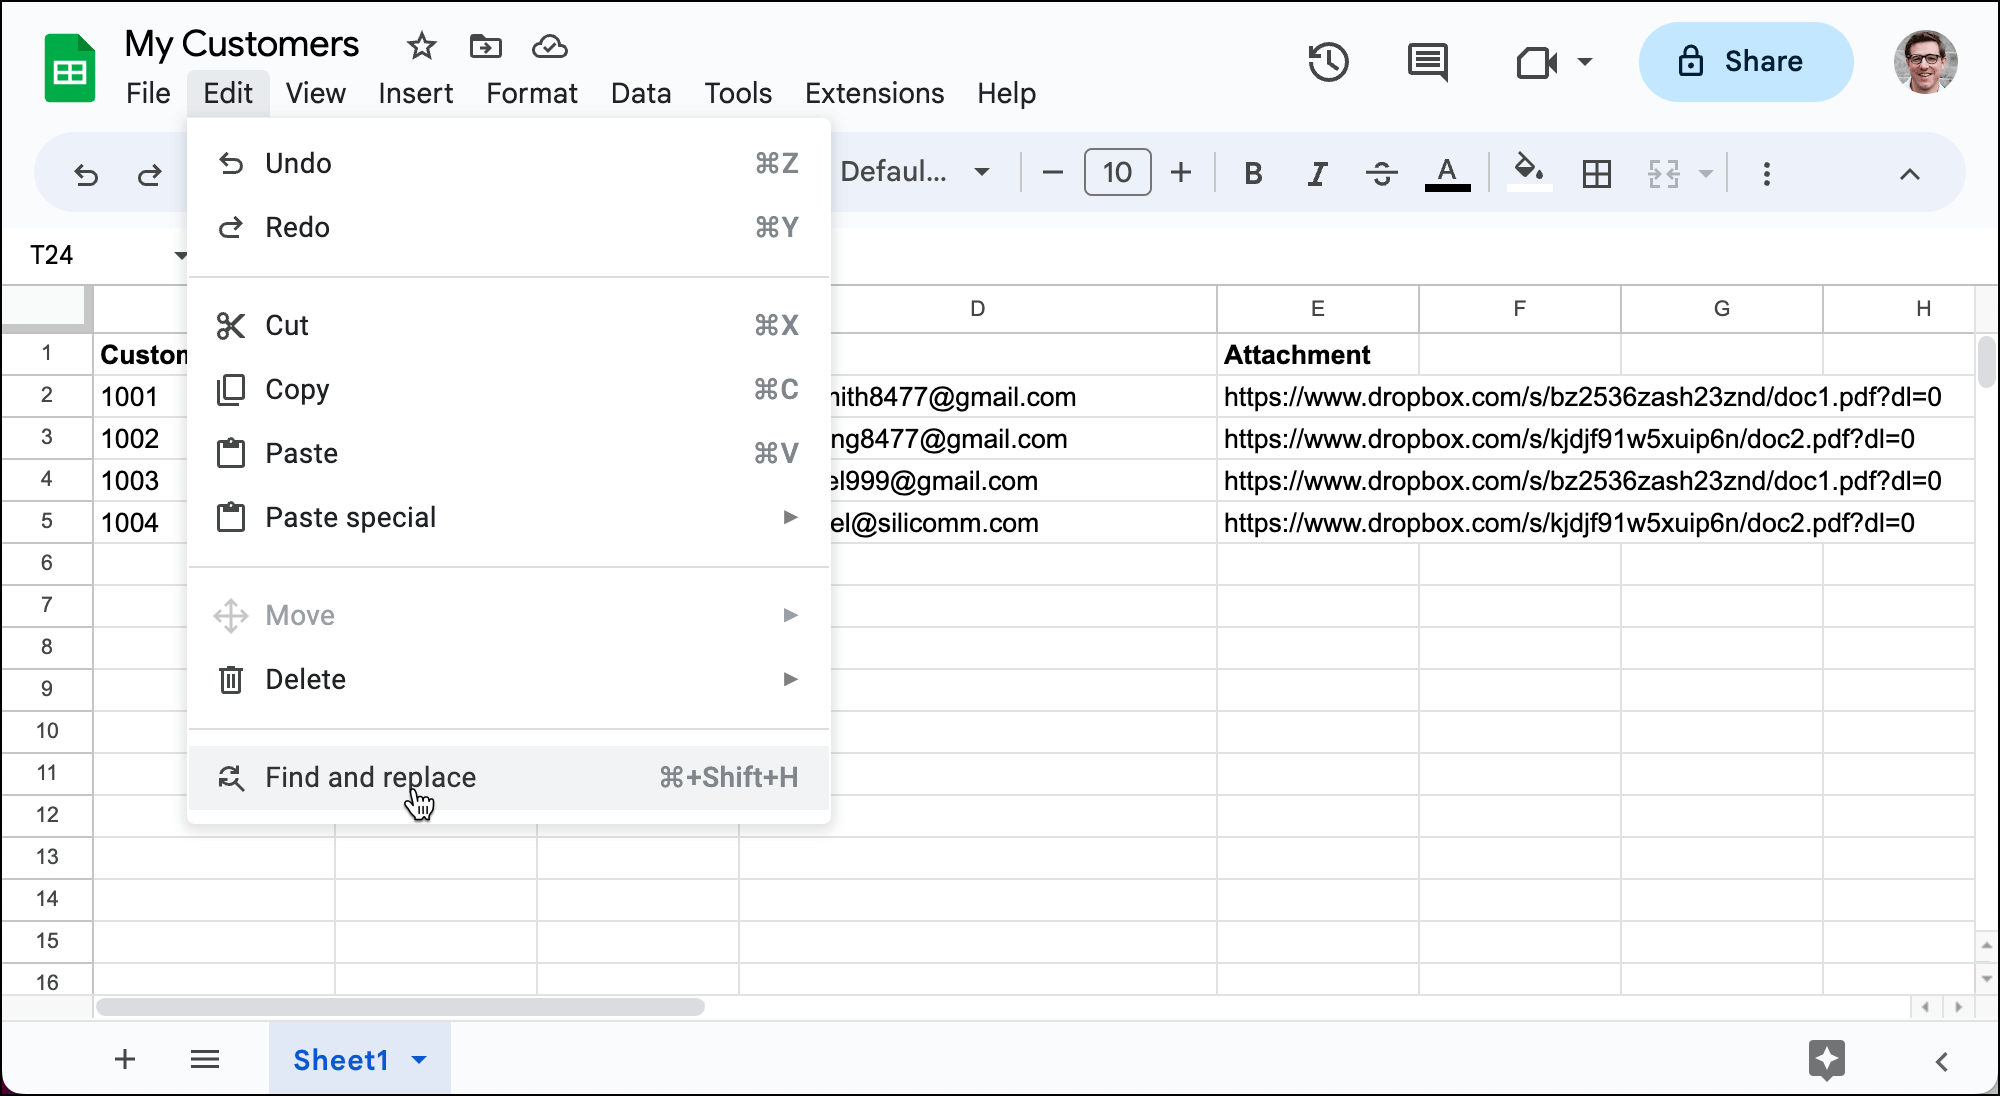
If you do go through the process of manually generating the Dropbox link for each file, then your Google Sheet will look like this:
BUT… those links won’t work as attachments in that form. Because those URLs actually go to Dropbox pages that display the PDF file, not the PDF file itself. And for this process to work, we need to get at the PDF itself. We’ll achieve that with Dropbox’s force download feature.
You’ll need to change the final 0 in each link to a 1.
So your links would now be:
https://www.dropbox.com/s/bz2536zash23znd/doc1.pdf?dl=1
https://www.dropbox.com/s/kjdjf91w5xuip6n/doc2.pdf?dl=1
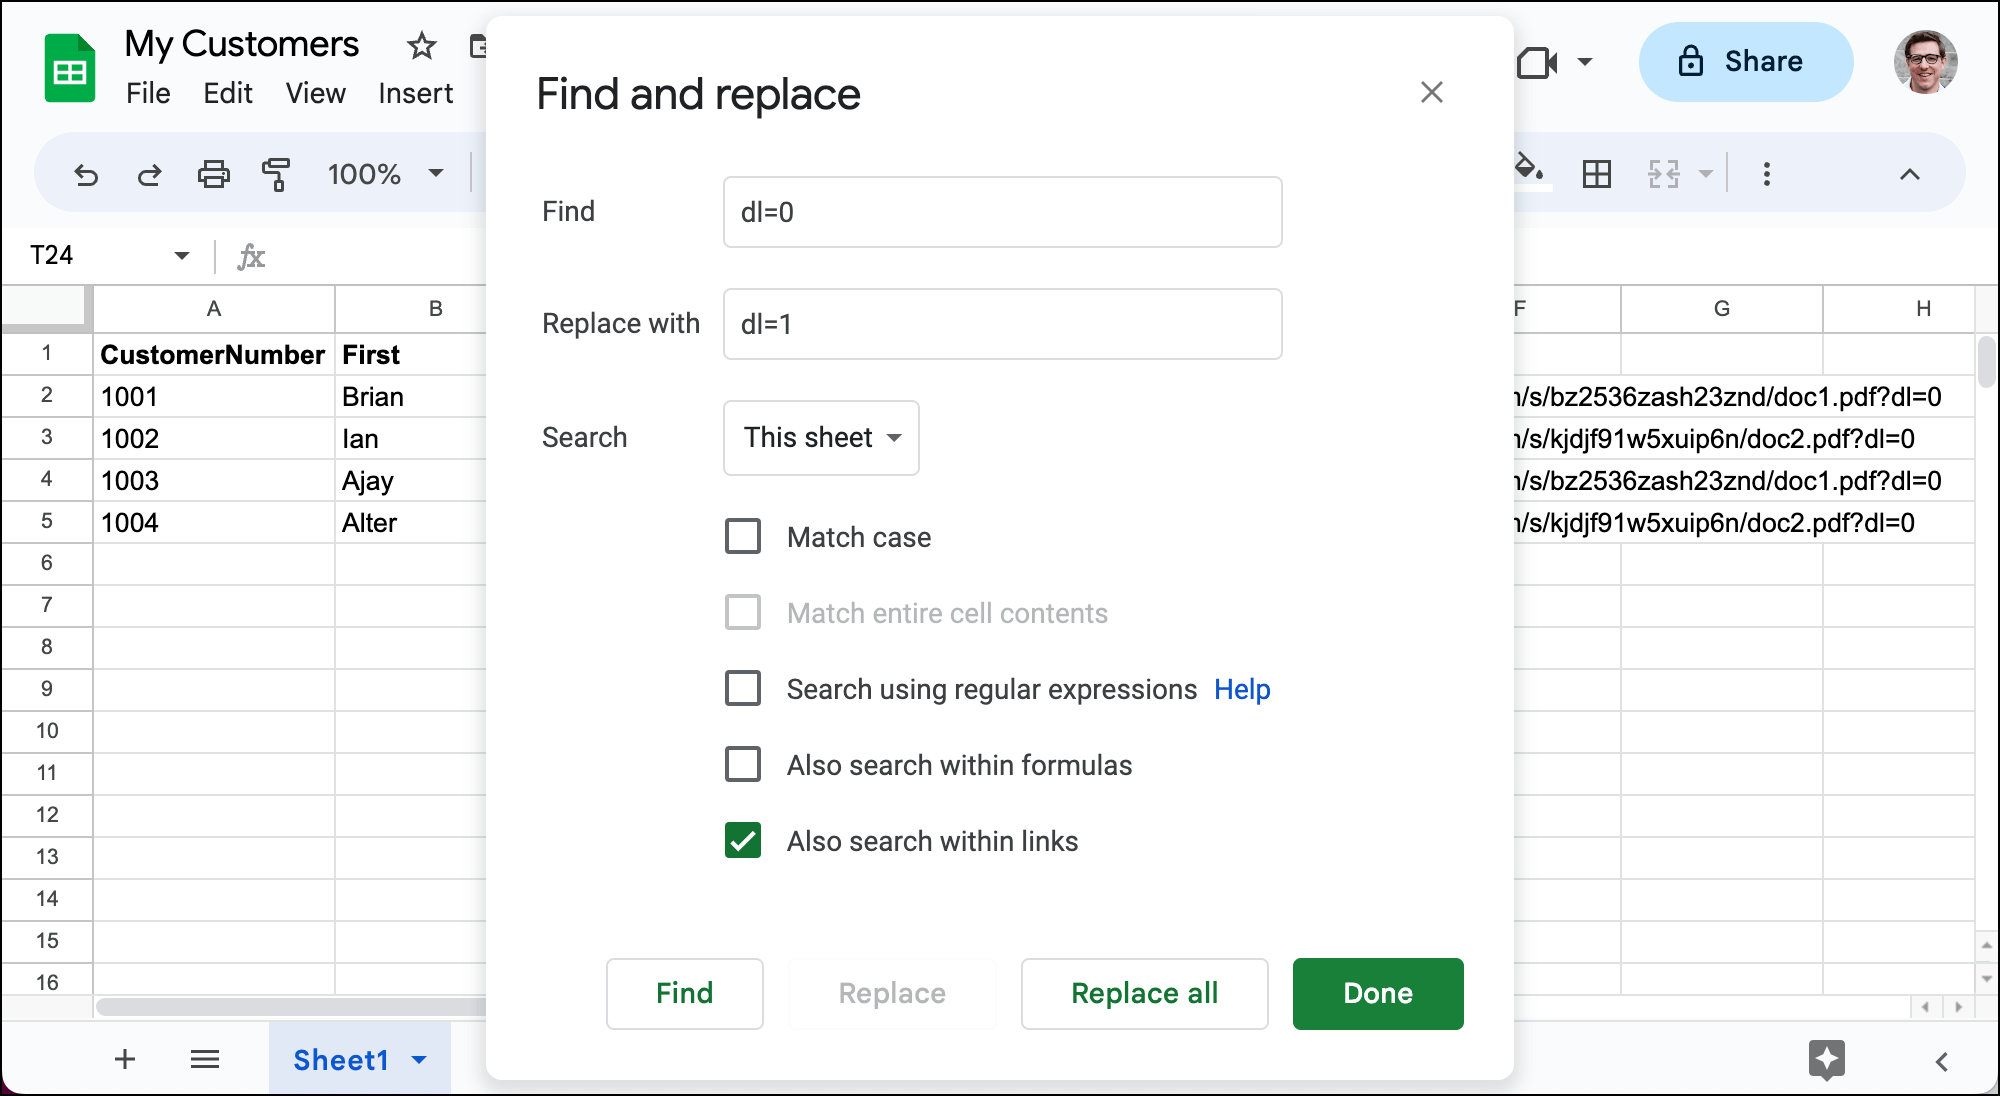
If you’re dealing with lots of links, a find-replace will save you lots of time on this process.
Go to Edit > Find and replace or hit Command/Control+Shift+H.
Find dl=0 and replace it with dl=1. I also recommend checking Also search within links if you pasted in the Dropbox URLs and Google turned them into links. Click the Replace all button
Using Amazon S3 to store your attachments
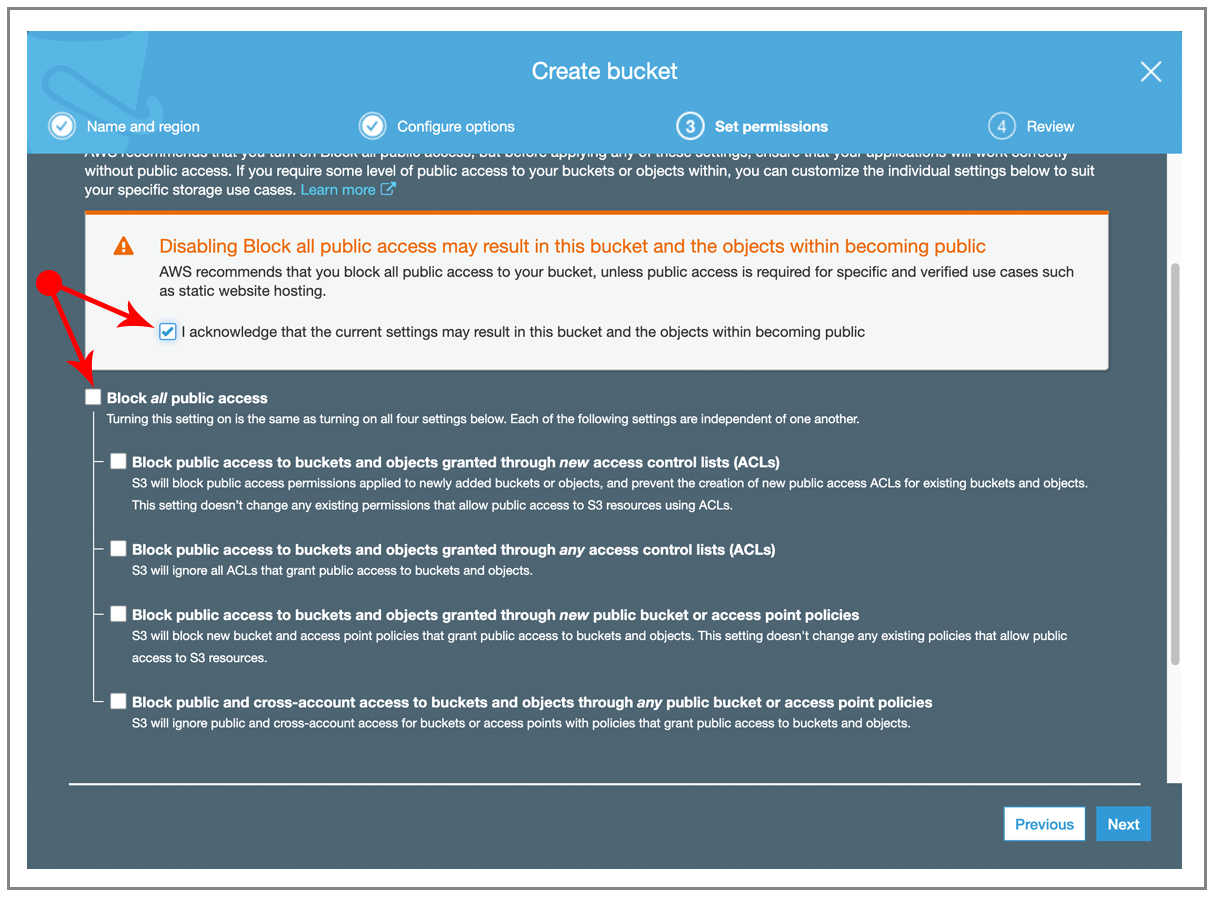
Using S3 is a much more convenient option than Dropbox to store files for the purpose of personalized attachments, because S3 makes it easy to determine the public URL for any file. By default, an S3 bucket isn’t public, so make sure that if you create a bucket for the purpose of attaching files to multiple emails, you make your bucket public. You must UNCHECK the “Block all public access” box and then CHECK the acknowledgement box:
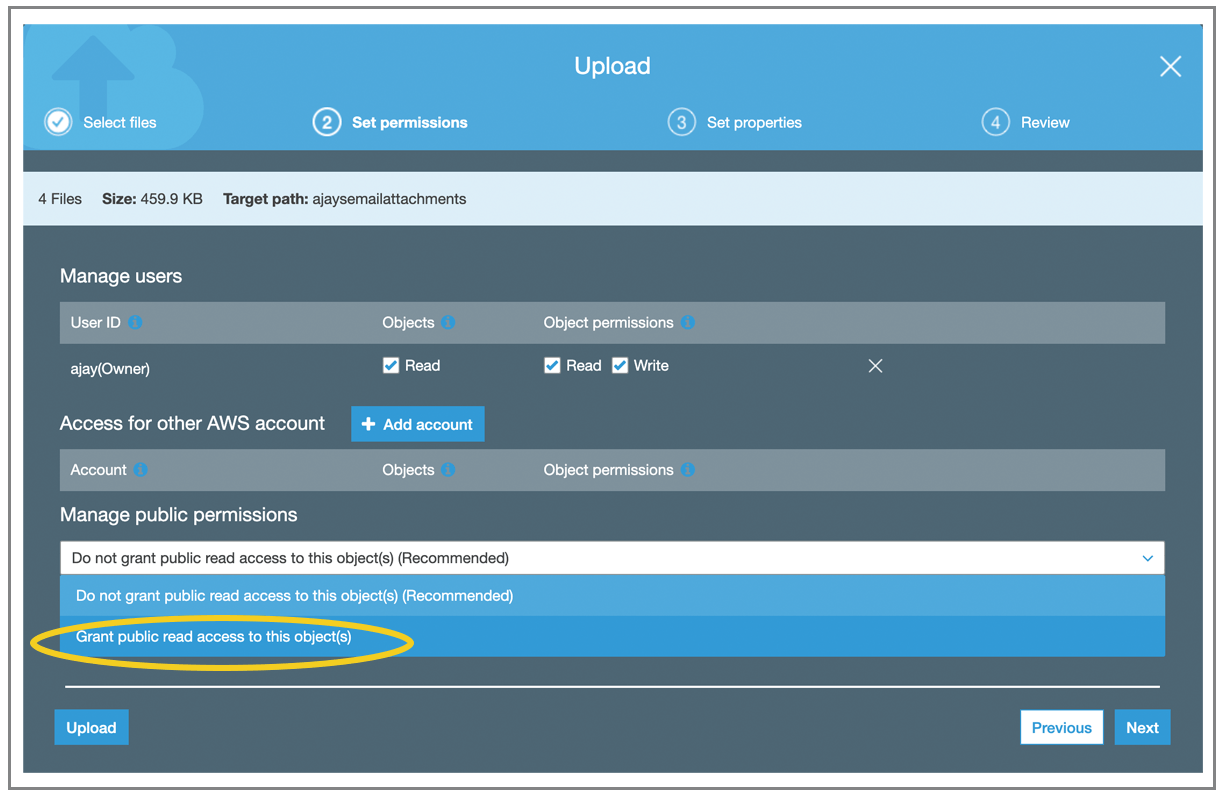
Then, when you upload your files to a bucket, make sure you choose “Grant public read access…” to the objects:
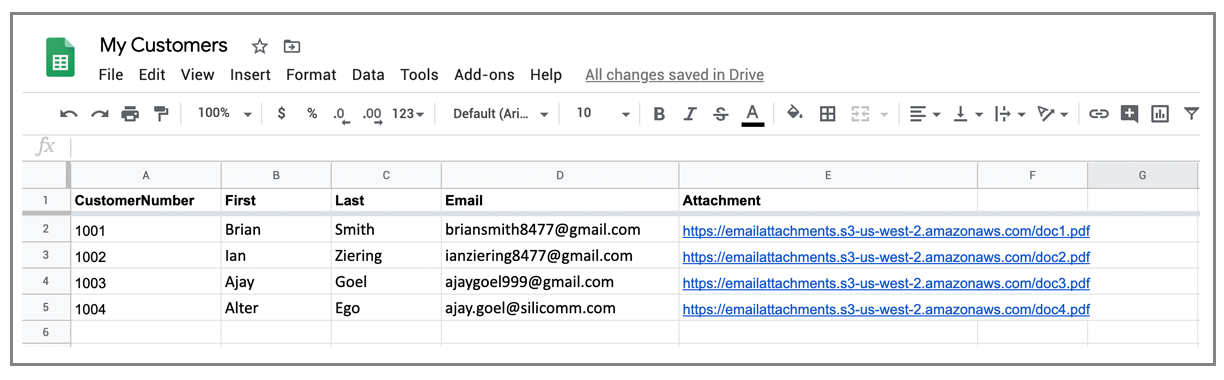
After your files are uploaded, S3 provides you with the public URL for each file, and it’s simply the DNS name you chose for your bucket in combination with the filename:

So in this case, my first two files will have the URL:
https://emailattachments.s3-us-west-2.amazonaws.com/doc1.pdf
https://emailattachments.s3-us-west-2.amazonaws.com/doc2.pdf
Note that these URLs don’t actually work, so don’t try visiting them! But, any files I upload to this bucket will have a URL in the same format, which means my Google Sheet would look like this:
Other mail merge tips and tricks
What else can you do to make your emails with personalized files even better?
- You can send attachments using the GMass API.
- Perhaps you don’t want to attach actual files to your emails, but you instead want to link to a unique file per email address. Here’s how you can send a campaign with personalized links.
- If you need a response from your recipients, consider setting reply-based follow-ups to send automatically.
- If you need to send more emails than your Gmail account allows, connect an SMTP service to your account or apply to use our in-house SMTP server. For example, if you need to send 10,000 customers a personalized PDF every month, you’ll want to integrate an external SMTP service so that Gmail doesn’t prematurely bounce your emails.
- Make sure your emails with attachments make it to the Inbox with our Spam Solver.
- If you ended up here looking for much simpler personalization options, like how to make each email start with “Dear {FirstName},” see our complete guide to personalization.
Email marketing. Cold email. Mail merge. Avoid the spam folder. Easy to learn and use. All inside Gmail.
TRY GMASS FOR FREE
Download Chrome extension - 30 second install!
No credit card required

Ajay is the founder of GMass and has been developing email sending software for 20 years.